

How to Organize an Adopt-a-Family Program Without Spread sheets?
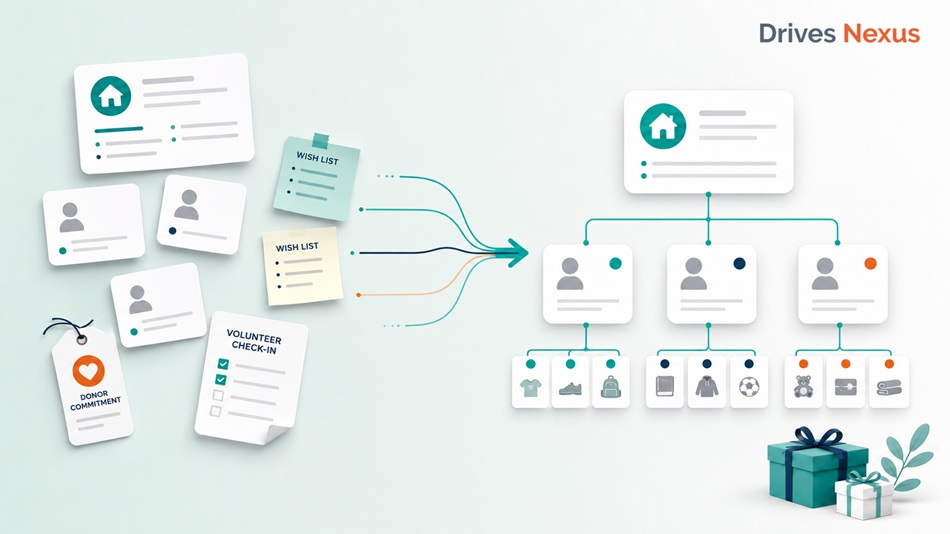
An Adopt-a-Family program is easiest to manage when every family, recipient, wish-list item, donor commitment, received gift, and distribution status is connected in one operating workflow. Spreadsheets can record this information, but they become difficult to control once several people are updating changing information at the same time.
The challenge is not creating a list of families.
The challenge is keeping that list accurate while:
- Families and wish lists are still being approved
- Donors are selecting needs
- Gifts are being delivered
- Staff are following up on missing items
- Volunteers are checking in donations
- Program leaders are preparing for distribution
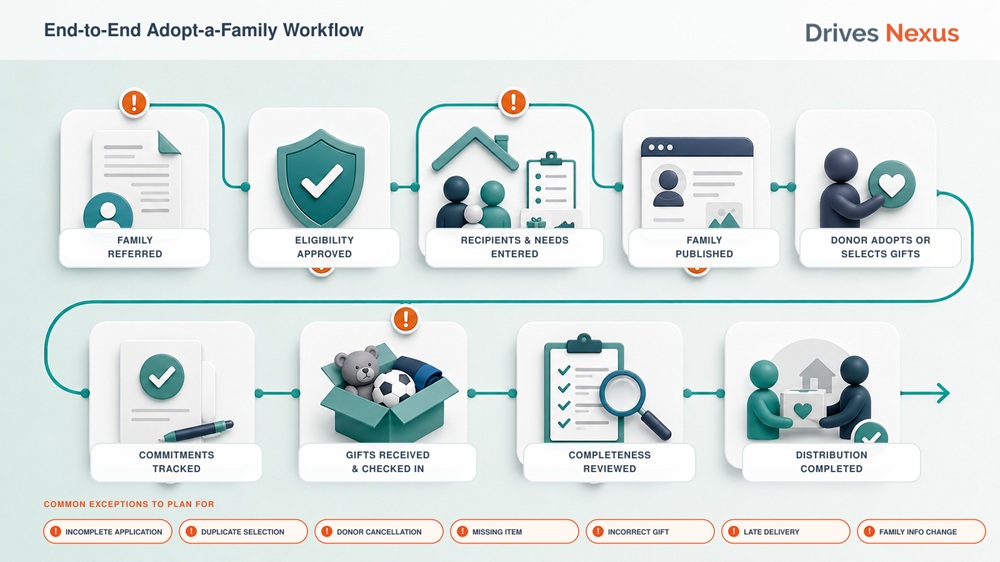
A successful Adopt-a-Family program therefore needs more than a spreadsheet template. It needs a clear structure for managing the full journey from family intake through final distribution.
Why Adopt-a-Family Programs Become Difficult to Manage
An Adopt-a-Family program combines several operational processes that are easy to underestimate.
A typical program may need to coordinate:
- Family applications or referrals
- Eligibility review
- Household and recipient information
- Individual wish lists
- Public donor-facing descriptions
- Family or item selection
- Donor confirmations
- Gift drop-off or shipment
- Donation check-in
- Missing-item follow-up
- Sorting and family completion
- Distribution or pickup
Each step changes the status of the next.
For example, when a donor selects a family, that family may no longer be publicly available. When gifts arrive, each item must be connected to the correct family. When one promised gift does not arrive, the family may need to be reopened for support or completed using emergency funds.
That is not a static list.
It is a live program workflow.
Where spreadsheets begin to fail
Spreadsheets often work during early planning because the number of users and changes is still limited. Problems usually appear once the drive opens.
Common failure points include:
- Two people editing different copies of the family list
- A donor selecting a family before the spreadsheet is updated
- Duplicate family or gift assignments
- Donor information stored in a separate file
- Items marked “complete” when they have only been promised
- Gifts arriving without a clear family identifier
- Staff manually comparing several tabs to find missing items
- Volunteers seeing sensitive information they do not need
- Leadership receiving outdated progress numbers
- Last-minute shortages becoming visible too late
The problem is not that spreadsheets cannot store information. It is that they do not naturally manage the relationships and status changes between families, recipients, donors, gifts, volunteers, and deadlines.
The Adopt-a-Family Operating Model
A well-organized program should treat the drive as six connected records:
- Family
- Recipient
- Need or wish-list item
- Donor commitment
- Received donation
- Distribution completion
Each record should have a clear status and relationship to the others.
Step 1: Define How Donors Will Participate
Before collecting family information, decide how the adoption model will work.
This choice affects the family structure, donor experience, communications, reporting, and follow-up process.
Option 1: One donor adopts an entire family
In this model, one donor or sponsor is responsible for all approved needs for a household.
Advantages
- Simple ownership
- Personal connection between sponsor and family profile
- Fewer donors to coordinate per household
- Easier family-level communication
Risks
- Larger financial commitment may reduce participation
- Large families may be harder to place
- One donor cancellation can put the whole family at risk
- Gift completeness depends heavily on one sponsor
Option 2: Donors select individual family members
A donor may sponsor one child, adult, or senior within the household.
Advantages
- Lower commitment per donor
- Large households can be divided
- Sponsors can choose an age group or recipient profile
Risks
- Several donors may be involved in one family
- Gifts must be carefully grouped during check-in
- One recipient may be complete while another remains unfulfilled
Option 3: Donors select individual gifts
Each approved need is independently available.
Advantages
- Lowest participation barrier
- Donors choose items that fit their budget
- Easier to promote specific outstanding needs
Risks
- Significantly more records and status changes
- More complex gift check-in
- More opportunities for duplicate or missing items
- Family completion requires item-level monitoring
Option 4: Hybrid participation
A program may allow organizations to adopt complete families while individual donors choose specific items.
This provides flexibility, but the workflow must clearly prevent the same need from being available through both paths simultaneously.
Program director decision: Choose the simplest donor model that serves your mission and audience. Flexibility is useful only when the team can manage the added complexity.
Step 2: Build a Clear Family Intake and Approval Process
Family data should not be published directly from an application or referral form.
It should move through an internal review process first.
A practical intake workflow is:
- Application or referral received
- Eligibility reviewed
- Duplicate participation checked
- Information clarified
- Wish-list items reviewed
- Family approved
- Public-facing profile created
- Family released for adoption
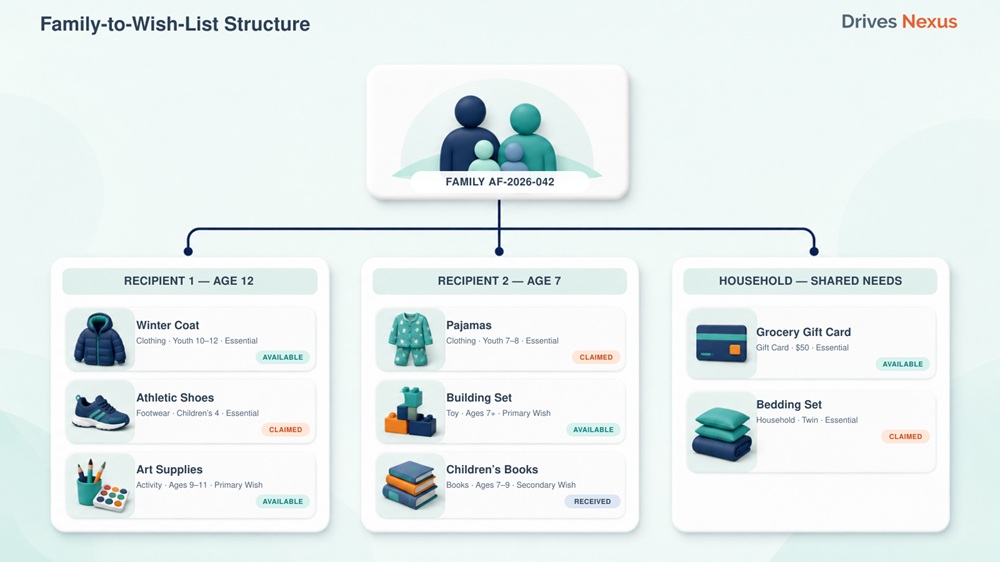
Assign a unique family ID
Every approved family should receive a unique program identifier such as:
AF-2026-001
AF-2026-002
AF-2026-003
That identifier should follow the family through:
- Internal records
- Donor confirmations
- Gift labels
- Drop-off
- Check-in
- Sorting
- Distribution
Do not use the family’s full name as the primary public identifier.
A structured ID reduces privacy exposure and helps volunteers connect gifts with the correct household.
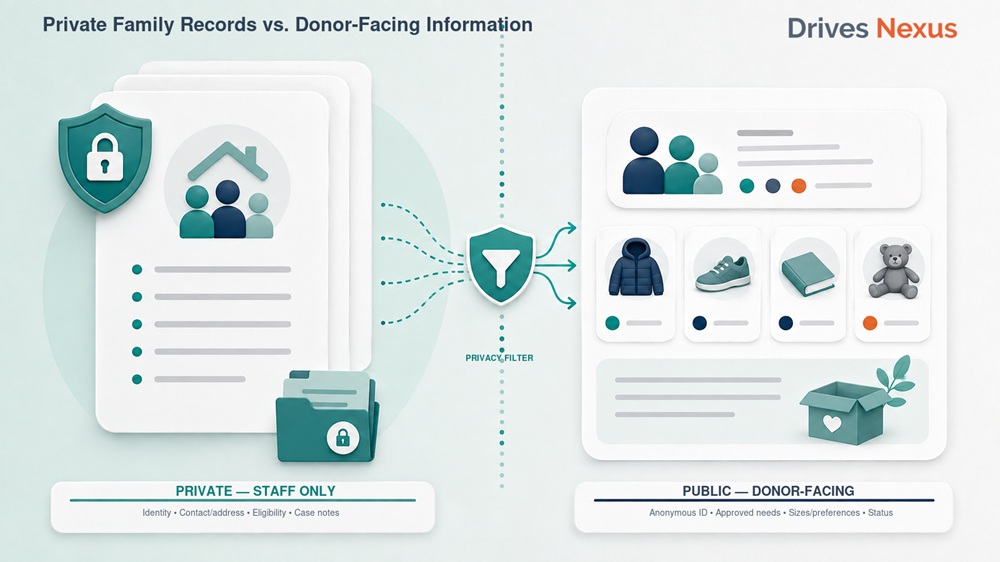
Separate internal and public information
Your case-management or program team may need detailed information that donors do not.
Internal information may include
- Full family name
- Contact information
- Address
- Referral source
- Caseworker
- Eligibility documentation
- Household circumstances
- Distribution location
- Internal notes
Public donor-facing information may include
- Family ID
- Number of household members
- Recipient ages
- Clothing or shoe sizes
- Interests
- Approved gift requests
- General family description
- Gift instructions
- Delivery deadline
Public information should be limited to what a donor genuinely needs to fulfill the request.
Step 3: Standardize Wish Lists Before Publishing Them
Wish lists should be reviewed and normalized before donors see them.
Unstructured wish lists create donor confusion, inconsistent giving, and unnecessary staff follow-up.
Avoid vague requests
Weak request:
Clothes and toys for a nine-year-old.
Stronger requests:
- Winter coat, youth size 10–12
- Athletic shoes, children’s size 4
- Art kit appropriate for ages 9–11
- LEGO-style building set
- Chapter books for a fourth-grade reader
- $25 grocery-store gift card
The stronger version gives donors enough information to act without contacting staff.
Use consistent item fields
Each need should include:
| Field | Example |
|---|---|
| Family ID | AF-2026-042 |
| Recipient ID | Child 2 |
| Category | Clothing |
| Item | Winter coat |
| Size | Youth 10–12 |
| Preference | Blue or black |
| Priority | Essential |
| Quantity | 1 |
| Notes | No fur trim |
| Public status | Available |
Separate needs from preferences
Not all requests carry the same urgency.
A practical classification could be:
- Essential: Coat, shoes, bedding, basic clothing
- Primary wish: Main age-appropriate gift
- Secondary wish: Additional optional gift
- Gift card: Food, fuel, household, or flexible use
- Household need: Shared family item
This helps program teams prioritize if not every request is fulfilled
Set limits before collecting requests
Define policies such as:
- Maximum number of items per recipient
- Recommended price range
- Whether electronics are allowed
- Whether gift cards are permitted
- Whether used items are accepted
- Whether gifts should be wrapped
- Whether donors may substitute items
- Whether the nonprofit may edit requests
Without clear limits, one family profile may contain three modest requests while another contains fifteen expensive items. That creates inequity and makes sponsor matching harder.
Step 4: Decide What “Adopted” Actually Means
This is one of the most important policy decisions in the program.
Does “adopted” mean:
- A donor clicked a family?
- A donor submitted contact information?
- A donor confirmed responsibility?
- Every item was selected?
- Gifts have been physically received?
- Staff verified the family is complete?
Those are different milestones.
A family should not be described internally as “complete” simply because a donor expressed interest.
Recommended family statuses
Use statuses that reflect the actual program lifecycle.
Draft
Family information is still being prepared.
Pending approval
The family has been entered but not yet cleared for publication.
Available
The family or needs are visible to donors.
Partially claimed
Some family members or items have been selected.
Fully claimed
Every required need has a donor commitment.
Partially received
Some committed gifts have arrived.
Fully received
All required gifts have physically arrived.
Review required
Staff must resolve a missing, incorrect, damaged, or unclear item.
Ready for distribution
The family package has been checked and approved.
Distributed
The family has received the gifts.
Closed
The family record has been finalized and archived.
This lifecycle gives program staff a much more accurate view than a simple Yes/No “Adopted” column.
Step 5: Keep “Claimed” and “Received” Separate
A donor commitment and a physical donation are not the same event.
This distinction is where many spreadsheet-based drives lose visibility.
Consider a family with 12 approved items:
- 12 items have been selected by donors
- 8 items have arrived
- 2 donors confirmed they will deliver later
- 1 donor cancelled
- 1 donor has not responded
A spreadsheet that says “100% adopted” makes the family look complete.
Operationally, the family is missing four items.
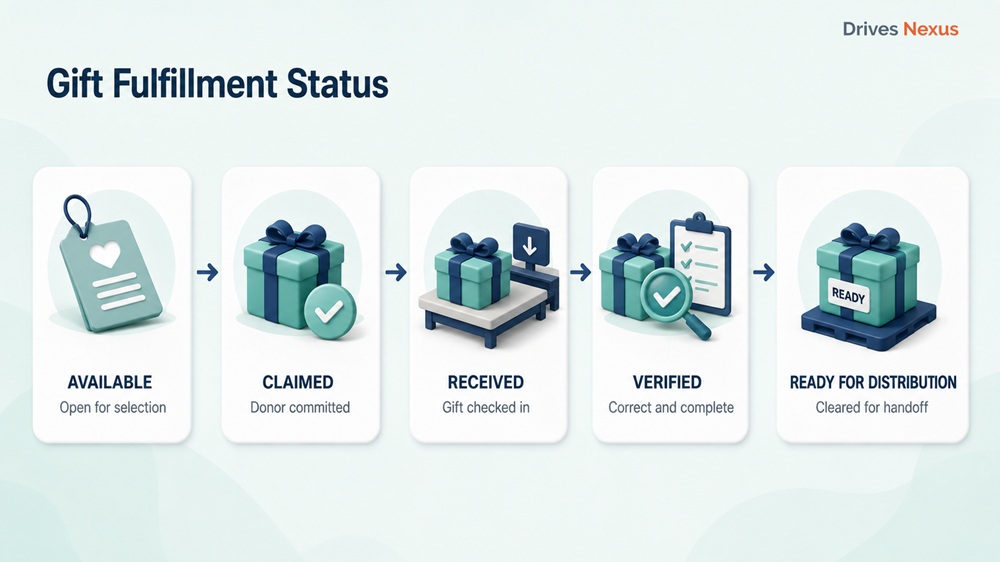
Track every item through a clear status sequence
Recommended item statuses:
- Available
- Claimed
- Confirmation pending
- Received
- Verified
- Missing or overdue
- Replacement required
- Ready for distribution
- Distributed
Not every organization needs all nine statuses, but every program should distinguish at least:
Available → Claimed → Received → Distributed
Establish a claim expiration policy
A donor should not be able to reserve a family or gift indefinitely without confirmation.
Define:
- How long a donor has to confirm
- When reminders are sent
- When an unconfirmed claim is reopened
- Who approves exceptions
- How the donor is notified
For example:
A donor selection remains reserved for 48 hours. If the donor does not confirm, the family or item returns to available status.
Use a policy appropriate for your organization and donor base.
Step 6: Create a Donor Experience That Does Not Require Staff Intervention
The donor should be able to understand the program and complete the selection process without calling or emailing the nonprofit for basic instructions.
A clear donor journey should answer:
- Who the program supports
- How family information is protected
- Whether donors adopt a family, recipient, or individual gift
- What they are committing to provide
- What price or gift guidelines apply
- Whether gifts should be wrapped
- How items should be labeled
- Where and when gifts must be delivered
- What happens if they cannot fulfill the commitment
- How they will receive confirmation
Use precise calls to action
Avoid vague buttons such as:
- Support Now
- Help a Family
- Get Involved
Use language that matches the actual action:
- Adopt This Family
- Select This Recipient
- Choose a Gift
- Confirm My Selection
- View Available Needs
The donor should know exactly what will happen after clicking.
Give donors a confirmation summary
After selection, the donor should receive a clear record containing:
- Family or recipient ID
- Selected items
- Sizes and preferences
- Delivery deadline
- Drop-off or shipping instructions
- Labeling instructions
- Contact details
- Cancellation or change process
The confirmation should function as the donor’s working checklist.
Prepare reminder messages in advance
Recommended reminders include:
- Selection confirmation
- Midpoint reminder
- Seven-day delivery reminder
- Final deadline reminder
- Missing-information request
- Thank-you confirmation after receipt
These messages should be prepared before launch, not written manually for each donor during the busiest week.
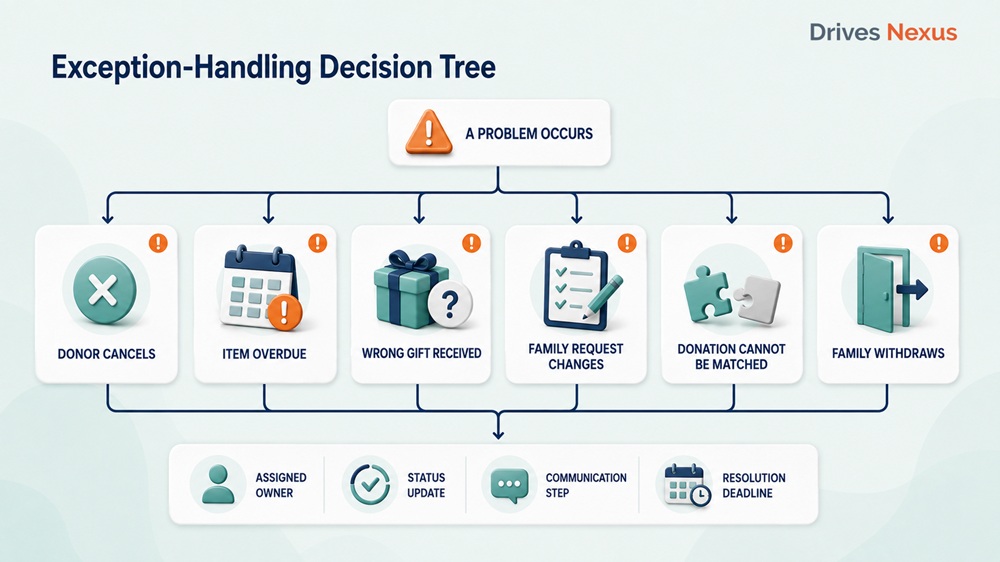
Step 7: Build an Exception Process Before Problems Occur
Every Adopt-a-Family program will encounter exceptions.
The difference between a controlled program and a chaotic one is whether the response has been defined in advance.
Donor cancels
Decide:
- Does the family immediately return to available?
- Does staff review it first?
- Are selected gifts reopened individually?
- Is an emergency sponsor contacted?
Promised gifts do not arrive
Decide:
- When is the donor considered overdue?
- How many reminders are sent?
- When does staff begin replacement outreach?
- Is there a purchasing reserve?
Wrong or unsuitable gift arrives
Decide:
Can it be reassigned?
Is the donor contacted?
Does staff purchase a replacement?
How is the incorrect item recorded?
Family information changes
Decide:
- Who may edit an active family?
- Are donors notified automatically or manually?
- What happens to gifts already purchased?
- Is the old information retained for audit purposes?
Family withdraws
Decide:
- Can donated items be reassigned?
- How is the donor informed?
- Who approves reassignment?
- Is the family record archived or deleted?
Gifts arrive without identification
Decide:
- Is there an exception table or holding area?
- What information will volunteers record?
- Who investigates unmatched donations?
- When can the item be reassigned?
Step 8: Give Staff and Volunteers the Right Level of Access
Not everyone involved in the drive needs access to all program information.
Role-based access protects family privacy and reduces accidental changes.
Program director
May need access to:
- All families and recipients
- Eligibility and approval status
- Donor commitments
- Exception handling
- Reports
- Distribution completion
Case-management staff
May need access to:
- Family intake
- Eligibility documents
- Recipient information
- Wish-list review
- Family changes
- Internal notes
Community outreach team
May need access to:
- Public family profiles
- Donor contact information
- Sponsor status
- Outreach reporting
- Communication templates
Volunteer coordinator
May need access to:
- Volunteer assignments
- Collection schedule
- Check-in status
- Sorting and distribution readiness
Check-in volunteers
May need access only to:
- Family or item ID
- Expected donation
- Check-in status
- Exception flag
They generally do not need to see private family circumstances or eligibility records.
Distribution volunteers
May need access to:
- Family ID
- Package location
- Completeness status
- Pickup or distribution instructions
The operating principle is:
Give each person access to the information required for the task—and no more.
Step 9: Design the Physical Gift Check-In Process
Even a well-organized online donor experience can fail if physical donations are not checked in consistently.
Require clear labeling
Every donation should include at least:
- Family ID
- Recipient ID, where applicable
- Item or gift ID
- Donor name or confirmation number
- Number of packages
Provide printable labels or a clear labeling template.
Establish a check-in station
A basic check-in workflow is:
- Scan or enter the family/item ID
- Confirm the expected gift
- Mark the gift as received
- Inspect for obvious mismatch or damage
- Record exceptions
- Place the item in the correct family staging area
Avoid bulk status updates without verification
Do not mark an entire family as “received” because several bags were delivered.
Each required need should be checked—or the program should have a deliberate family-level verification process.
Create an unmatched-donation area
Gifts that cannot immediately be identified should be:
- Physically separated
- Logged
- Photographed where useful
- Assigned an exception ID
- Investigated by a designated owner
Unmatched items should not be placed randomly into family packages merely to clear the check-in table.
Step 10: Review Family Completeness Before Distribution
A family package should go through a final review before it is marked ready.
Recommended completeness check
For each family, verify:
- Every essential need has been addressed
- Every required recipient has gifts
- Sizes match the approved requests
- Gift cards are recorded
- Donor notes have been reviewed
- Unidentified gifts have been resolved
- Damaged or inappropriate items have been replaced
- Family labels match the distribution record
- Package count is documented
- Pickup or delivery instructions are confirmed
Separate “fully received” from “ready for distribution”
A family may have every expected item but still require:
- Sorting
- Quality review
- Repackaging
- Label correction
- Gift-card verification
- Transportation preparation
“Fully received” describes inventory status.
“Ready for distribution” describes operational readiness.
What Should the Program Director See Every Day?
During an active Adopt-a-Family program, leadership should not need to ask staff to manually assemble a report.
A useful operating dashboard should answer:
Family progress
- Total approved families
- Families available
- Families partially claimed
- Families fully claimed
- Families fully received
- Families requiring attention
- Families ready for distribution
- Families distributed
Item progress
- Total approved needs
- Available needs
- Claimed needs
- Received needs
- Overdue needs
- Replacement needs
- Verified needs
Donor progress
- Total participating donors
- Unconfirmed selections
- Upcoming delivery deadlines
- Overdue commitments
- Corporate or group sponsors
- Repeat donors
Operational risk
- Families with essential items missing
- Families with upcoming deadlines
- Unmatched donations
- Changed family requests
- Donor cancellations
- Distribution exceptions
The dashboard should direct attention toward exceptions—not merely display totals.
Why One Spreadsheet Often Becomes Several
Most nonprofit teams do not intentionally design a fragmented process.
It grows gradually.
The first spreadsheet tracks families.
A second file is created for donor contact details.
A volunteer creates another version for collection.
The outreach coordinator maintains an email list.
A separate tab tracks missing gifts.
Printed copies are used during check-in.
A final spreadsheet is built for distribution.
Each file solves one immediate problem while making the overall system harder to reconcile.
By the time distribution approaches, staff must compare several sources to determine whether a family is actually complete.
The better approach is to organize the entire program around one connected record:
Family → Recipients → Needs → Donor commitments → Received gifts → Distribution
When Is a Spreadsheet Still Enough?
A spreadsheet may be sufficient when:
- The program serves a small number of families
- One person controls all updates
- Donors adopt complete families
- There are few gift-status changes
- Check-in is simple
- Reporting requirements are limited
- Family information does not need role-based access
A dedicated drive-management process becomes more valuable when:
- Several staff or volunteers update information
- Donors select individual items
- The program serves many households
- Recipient privacy requires controlled access
- Multiple collection sites are involved
- Claimed and received gifts must be tracked separately
- Corporate or community partners participate
- Leadership needs current progress reports
- Missing-item follow-up consumes significant staff time
The question is not:
“Are spreadsheets bad?”
The better question is:
“Has the program become too dynamic and interconnected to manage safely as a collection of static files?”
Common Adopt-a-Family Program Mistakes
Publishing families before reviewing wish lists
Incomplete or inconsistent requests create donor confusion and later corrections.
Using family names as public identifiers
This can unnecessarily expose personal information and make gift-handling less consistent.
Allowing unlimited donor holds
Families may appear unavailable even when the donor has not confirmed the commitment.
Marking a family complete when all gifts are only claimed
The program may not discover missing donations until the final week.
Giving every volunteer full access
This increases privacy risk and accidental data changes.
Failing to label individual gifts
Unidentified donations require manual investigation and can end up with the wrong family.
Waiting until distribution week to review completeness
Missing essential items should be identified early enough for replacement outreach.
Having no process for donor cancellations
Staff then make case-by-case decisions under deadline pressure.
Tracking only family-level status
A family may look “adopted” while several recipient needs remain incomplete.
Adopt-a-Family Program Checklist
Program structure
- Donor participation model selected
- Program dates established
- Family limits defined
- Wish-list rules documented
- Staff ownership assigned
- Success measures defined
Family intake
- Eligibility process documented
- Unique family IDs assigned
- Duplicate participation checked
- Internal and public data separated
- Consent and privacy process reviewed
- Family approval completed
Wish lists
- Item limits established
- Requests standardized
- Sizes and preferences verified
- Essential versus optional needs classified
- Vague or inappropriate requests corrected
- Public descriptions reviewed
Donor experience
- Adoption instructions published
- Confirmation process tested
- Delivery requirements clear
- Reminder messages prepared
- Cancellation process documented
- Donor FAQ available
Gift tracking
- Available and claimed statuses separated
- Claimed and received statuses separated
- Overdue-item process defined
- Replacement process assigned
- Check-in workflow tested
- Gift-labeling standard published
Volunteers and distribution
- Role-based access established
- Collection locations prepared
- Volunteer instructions completed
- Unmatched-item process defined
- Family completeness review assigned
- Distribution records prepared
Organize the Program Around the Work That Must Happen
The public-facing purpose of an Adopt-a-Family program is simple: connect generous donors with families who need support during the holidays.
The operational work behind that purpose is not simple.
Program directors and community outreach teams must manage:
- Family privacy
- Wish-list quality
- Donor participation
- Changing commitments
- Physical gift collection
- Missing-item follow-up
- Volunteer access
- Family completeness
- Distribution readiness
When those responsibilities are distributed across spreadsheets, inboxes, printed lists, and individual staff knowledge, the program becomes harder to control as it grows.
Drives Nexus gives nonprofit teams one organized place to structure families and needs, share available opportunities with donors, and track what has been selected, received, and still requires attention.
This fall, nonprofits can run one Adopt-a-Family, toy, winter coat, or holiday gift drive free with DrivesNexus.
Frequently Asked Questions
How do you organize an Adopt-a-Family program?
Start by defining whether donors will adopt complete families, individual recipients, or individual gifts. Then establish a family intake and approval process, standardize wish lists, assign unique family IDs, separate public from private information, and track every need from available through received and distributed.
What information should be included in an Adopt-a-Family profile?
A donor-facing profile may include a family ID, household size, recipient ages, clothing sizes, interests, approved gift requests, and delivery instructions. Full names, addresses, case histories, and other sensitive details should generally remain within the nonprofit’s internal program records.
How can a nonprofit prevent two donors from adopting the same family?
Use a centralized process that changes the family or item status immediately when selected. The system should also support confirmation deadlines and automatically or manually reopen unconfirmed or cancelled selections.
What is the difference between an adopted family and a completed family?
An adopted family has one or more donor commitments. A completed family has all required gifts physically received, verified, organized, and ready for distribution. Programs should not treat those statuses as interchangeable.
How should gifts be labeled?
Each gift should include a family ID and, where relevant, a recipient or item ID. Including a donor name or confirmation number can also help staff resolve questions during check-in.
Can donors select individual gifts instead of entire families?
Yes. Individual gift selection can lower the participation barrier, but it increases item-level tracking, donor coordination, and check-in complexity. The nonprofit should choose a model it can reliably administer.
What should happen if a donor does not deliver a promised gift?
The nonprofit should have a predefined overdue process that includes reminders, a replacement deadline, reopening the need where appropriate, and escalation to emergency purchasing or alternate sponsors.
Can a small Adopt-a-Family program still use a spreadsheet?
Yes. A spreadsheet may be adequate for a small program managed by one person with simple family-level adoption. The risk grows as more users, individual items, collection sites, donors, exceptions, and reporting requirements are added.